Categories
News Tech

Stellar Windows Data Recovery Offers Better Results than EaseUS Data Recovery Wizard Free

Nearly every important data we have is stored on our computers, and considering that Windows is the most popular OS used globally, it’s no wonder that it is also the one that it is extensively mishandled, attacked by viruses, formatted or bugged, leading to data loss. Instead of panicking, there’s a solution: use a data loss recovery software that can restore your lost data, no matter what it is – texts, audio, videos, and so on.

Here’s a great data recovery software from Stellar. We’ll see why the Free Edition of Stellar Windows Data Recovery is much better than the EaseUS Data Recovery Wizard Free.

Stellar Windows Data Recovery Free Edition Versus EaseUS Data Recovery Wizard Free

Stellar Windows Data Recovery is a free recovery software that can recover lost or deleted data and formatted partitions from Windows. It recovers any type of file and folder, and users can even add more file types with no restriction whatsoever. It can recover the files from the system or from external drives that you connect – such as external hard drives, SD cards, USBs, and so on. The interface is user-friendly and is easy to use without any help. The service supports five languages and offers Unicode support.

EaseUS Data Recovery Wizard Free is also a powerful recovery software, that can recover different types of files from inside and outside your Windows OS (through a wired connection), just like Stellar Windows Data Recovery does. It supports nearly 20 languages.

But how do these two services compare in terms of features and requirements? Here are a couple of tables to see them side by side:

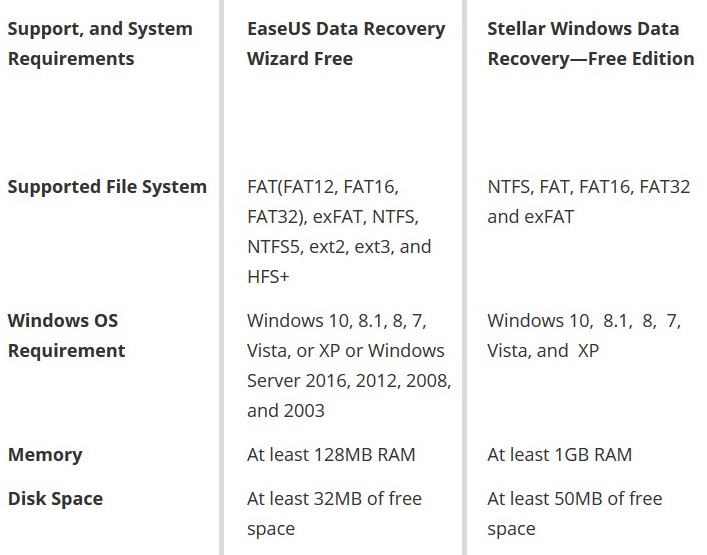
In terms of support and system requirements, supported file systems, Windows OS requirement, memory, and disk space, EaseUS Data Recovery Wizard Free has the upper hand.

However, when it comes to features, it is where Stellar Windows Data Recovery (Free Edition) excels. Not only it offers various features, but it also recovers up to 1GB of data compared to EaseUS Data Recovery Wizard (Free) which only recovers up to 500 GB of data.

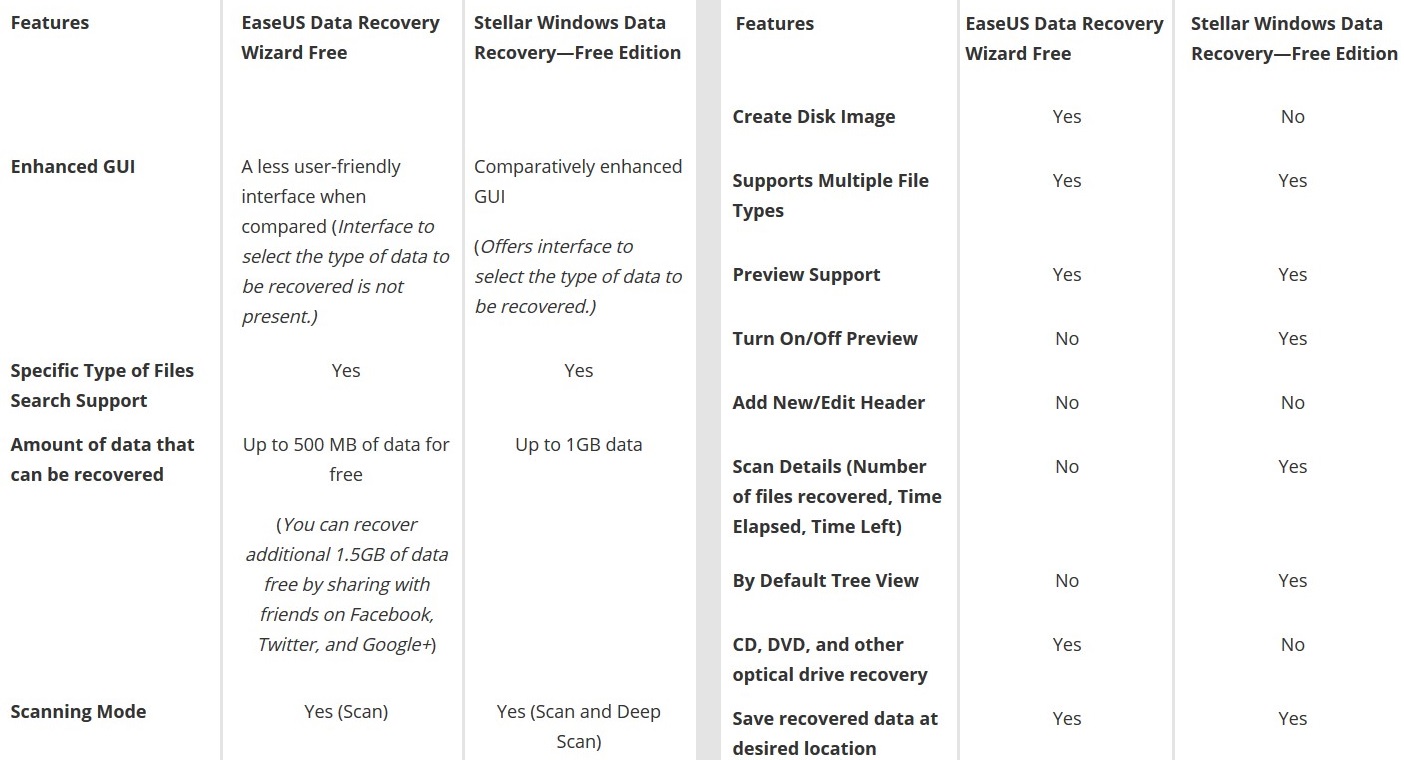
Stellar Windows Data Recovery comes with a deep scan, has a preview in three-pane structure, shows scan details, and gives you the option to select the type of data you want to recover. Meanwhile, EaseUS Data Recovery Wizard Free software lacks these features.

If you’re looking for more features and don’t care about the system requirements, go for the software that has more features, which is Stellar Windows Data Recovery (Free Edition).

Categories
News Tech

How To Remove Ferosas Ransomware and Restore your Data

Ferosas ransomware is a dangerous threat, also a part of the outrageous Divu ransomware. Its extension is designed for encrypted data, with a message named ‘_readme.txt’ and shared the conditions you need to follow to get the decryption key.

This ransomware is designed for beneficial aspirations only. You should not take the scammers word in serious as they might take your money but never send you the decryption tool.

To detect whether your device has been infected with malware, you should install a renown anti-malware program like Reimage. Various techniques can help you and let you restore your files. Keep reading to find out which they are.

After removing the ransomware, ensure your files and documents are safe at all times. Use portable USB drivers or Dropbox or iCloud to keep your data untouchable.

Also, another fact you need to know about Ferosas is that it might use a tricky method to access your computer systems, such as email spam and malicious attachments, hyperlinks or ads, and such sources.

How to remove the Ferosas ransomware

Ferosas only appears on Windows-powered computers, but the only steps you can take is rebooting your device to Safe Mode with Networking or enabling the System Restore option to disable the ransomware’s activities.

What you can do is to run a full system scan with software such as Reimage, identify the malware-infested objects and automatically annihilate them.

Remove Ferosas using Safe Mode with Networking

  1. Reboot your PC to Safe Mode with Networking
  2. Delete FerosasLog into the infected account and open the browser
  3. Download Reimage or other such anti-spyware
  4. Update it and do a full system scan
  5. Remove all the malicious files that came with the ransomware
  6. Complete the ransomware removal

Guides for Windows 7, Windows Vista, Windows XP

  1. Go to Start, select Shutdown, then Restart, and OK
  2. When your PC restarts, start tapping on F8 until the Advanced Boot Options appears
  3. Select Safe Mode with Networking

Guides for Windows 8, Windows 10

  1. Tap on the Power button at the Windows login screen
  2. Tap on Shift and hold
  3. Click Restart
  4. Go to Troubleshoot, then to Advanced options, Startup Settings and then Restart
  5. After the PC becomes active, select Enable Safe Mode with Networking

If the Ferosas ransomware is blocking your attempt to remove it with Safe Mode with Networking, try the below method instead.

Remove Ferosas using System Restore

To activate the System Restore option, follow the guide below.

Reboot your PC to Safe Mode with Command Prompt

​Guidelines for Windows 7, Windows Vista, Windows XP

  1. Click on Start, then on Shutdown, on Restart, and OK
  2. As soon as your PC becomes active, press F8 numerous times until the Advanced Boot Options window appears
  3. Choose Command Prompt

Guide for Windows 10, Windows 8

  1. Press the Power button
  2. Press and hold Shift
  3. Select Restart
  4. Choose Troubleshoot, then Advanced Options, Startup Settings and then Restart
  5. After the PC starts again, choose Enable Safe Mode with Command Prompt from the Startup Settings option

Restore your system files and settings

​1. After the Command Prompt window appears, enter CD restore and select Enter

  1. Type ‘rstrui.exe’ and click Enter
  2. A window will appear – click Next and choose your restore point (before the Ferosas infestation). After doing this, click Next
  3. Select Yes to start system restore

After you restore the system to a previous point, download, install, and then scan your PC with Reimage program to ensure that Ferosas annihilation is completed with success.

Recover your data

This third-party software can be used to restore some of your files that have been blocked by the ransomware.

  1. Download Data Recovery Pro
  2. Follow the guidelines of the Data Recovery Setup to install it
  3. Open it and scan your PC for data files encrypted by the thread
  4. Restore them

Also, Windows Previous Versions program can aid in recovering data files.

  1. Find an encrypted document and click right on it
  2. Choose Proprieties
  3. Select Previous versions
  4. Check every available copy of the document in Folder versions
  5. Select the option you want to have back and click Restore

There is no official Ferosas ransomware decryptor on the market yet, but you should always keep your PC protected. To do this, use a renown anti-spyware program such as Reimage, Malwarebytes, or Plumbytes Anti-Malware.

Categories
News Tech

Gmail Vs. Microsoft Outlook Vs. Yahoo Mail Vs. AOL Mail – Best Free Email Services In 2019

We may be living in the streaming and social media age, but the humble email remains one of the most important and useful communication tools in the world. Below you can find a list which describes some of the most popular email services in the world – Gmail, Microsoft Outlook, Yahoo Mail, and AOL Mail.

Gmail Vs. Microsoft Outlook Vs. Yahoo Mail Vs. AOL Mail – Which One Suits You Best?

Gmail

With more than one billion active users each month, Gmail is, without a doubt, one of the most popular email solutions. The fan-favorite service sports a selection of useful features, among which we can count a slick interface, excellent integration with other Google services and a robust protocol which keeps spam away.

Users have the option to snooze select emails, add an expiration date to their message, and block access to a particular email with the help of a special code.

Microsoft Outlook

Offered by one of the giants of the IT industry Outlook packs several features. Users will work with a streamlined interface which puts every tool at your fingertips. Certain interface features can be customized according to your wishes.

Outlook also allows users to automate a certain task, including email sorting and forwarding.

Yahoo Mail

Yahoo Mail is one of the most popular email services in the world, and it is likely that most users had at least one Yahoo Mail account at one point.

Those who opt for this service will enjoy 1 TB of free storage space. Users also have the option to create several disposable addresses linked to a master account, which means that you can get all your email in one place without the need to use the same address.

AOL Mail

It may be one of the oldest services on the market, but AOL Mail offers a few useful features. A great advantage comes in the form of fine-tuning as users can customize a large number of specialized settings according to their wishes, including advance spam filters.

While these services are great for personal use, those who wish to use them for professional purposes should opt for a paid email solution, which tends to offer a large number of additional tools.

Categories
Tech

How to Speed Up Windows 7 PC

Having problems with your PC’s running speed? You can now optimize and make it run faster. In this tutorial, we’ll be showing you exclusive workaround on how to speed up Windows 7 PC.

Most Windows users still run on Windows 7, which is basically due to its relative ease of use. However, it is prone to various degrees of speed-reducing errors/issues.

To resolve this, we’ll be showing you simple guides on how to improve the running speed of Windows 7 PCs.

How to Speed Up Windows 7 PC

With issues like limited disk space (leading to congestion), multiple startup programs, and/or disk fragmentation among others, you are bound to experience system lag (reduced running speed) on your PC.

To resolve this and speed up your computer, you can employ one, some or all of the methods outlined herein.

Method 1: Troubleshoot performance

Windows hosts an inbuilt performance troubleshooter, which is designed to identify and fix problems or bugs associated with reduced system performance.

To run the performance troubleshooter on Windows 7, follow the guidelines below:

  • Open Start menu: click on the ‘Windows’ icon on your screen.
  • Select Control Panel.
  • Key in “troubleshooter” in the search panel and press Enter.
  • Select Troubleshooting from the displayed search results.
  • Navigate to the System and Security section and select Check for performance issues.
  • Follow the prompt commands to finish up the process.

This action will reveal & fix any bug or system/security issue causing the system lag.

Method 2: Hard disk defragmentation & cleanup

Many times, hard disk fragmention puts too much pressure on your system and consequently makes it run slower. If unaddressed, this could lead to eventual system crash.

To fix this issue, simply defragment (separate into fragments) your PC’s hard disk, using a disk defragmenter to reorganize fragmented files. You can also defragment your hard disk manually.

Also, in the event that your disk space becomes choked up, you can easily clean up your hard disk to create more space. This would significantly improve your PC’s performance and running speed.

Method 3: Other Methods

Other methods to try in speeding up Windows 7 PC include:

  • Restarting PC
  • Scanning and clearing up malwares/spywares/ransomware
  • Limiting startup programs
  • Disabling virtual display
  • Resetting/reducing virtual memory
  • Removing big-sized redundant programs and files
  • And more.
Categories
Tech

4 Ways to Fix iPhone Black Screen of Death

iPhone is without doubt one of the prestigious smartphones in this modern age. However, iPhone users encounter several issues such as the iPhone Black Screen of Death. The iPhone Black Screen of Death on the other hand, is simply an instance where the iPhone screen is completely black.

The black screen in iPhone may occur as a result of hardware or software issues. For instance, iOS upgrade/downgrade, iOS jailbreaking, firmware modifications, drained battery, crashed app, etc. But we can show you effective solutions to fix this problem.

Fix iPhone Black Screen of Death using any of these solutions

Solution 1: Force-restart your iPhone

If you experienced the iPhone black screen problem, you should immediately restart your iPhone.

Here’s how to do this:

For iPhone 7 or iPhone 7 Plus: Press and hold both the power and volume button for at least 5 seconds until the Apple logo appears.

For other iOS devices: Press and hold both the Power and Home button, for at least 10 seconds until the Apple logo appears.

This will resolve the black screen problem after the reboot.

Solution 2: Charge your iPhone

One of the main reasons why the iPhone black screen problem may occur may be due to drained brained. Therefore, you should connect your iPhone to a power adapter. Press the Home button and the wait for a few minutes till the Apple logo appears.

Solution 3: Close the problematic app

If your iPhone screen went black after launching a certain app, then that app is responsible for the problem. In order to fix the problem, quickly press the “Home” button twice, and then swipe the screen to see a list of recent apps. Once again, swipe off that specific app to close it and press the Home button to return to the home screen.

Solution 4: Contact Apple Store

If you are still unable to fix the iPhone Black Screen after trying out any of the afore-mentioned solutions, then the black screen may be due to a hardware issue. For instance, the iPhone may have fallen to the ground. Nevertheless, you should take your iPhone to the Apple Store if under warranty coverage.

Hope you were able to fix the Apple iPhone Black Screen problem by applying any of the solutions we mentioned above? Drop us a comment below.

Exit mobile version